Update: now available in video form!
In order to play musically and express themselves, a violin player must spend years perfecting their intonation and bowing technique. In contrast, a hurdy gurdy player achieves much of their sonic expression and stylistic refinement in the selection, preparation and set-up of an instrument, investing time and technical skills before playing to ensure good sound and function. These technical skills start with the most basic set-up such as tuning and applying rosin and cotton, and can extend all the way to constructing your own instrument. Building chiens lies somewhere between these two extremes. If you have a damaged or poorly constructed instrument, it could drastically improve sound and playability! Even if you have a well built instrument, going DIY allows you to experiment with different trompette sounds and responses, and reduces dependency on your musical instrument maker if a chien breaks or goes missing.
In this guide I try to document how I build French-style chiens as of 2018 (I have no experience with Hungarian-style buzzing bridges). I can’t claim that this is the best way, will provide perfect results, or that it’s suitable for all instruments; nor can I offer much advice for getting a particular sound or response — partly because the properties of the chien itself are only a small portion of hundreds of factors affecting the buzz. I offer this guide simply as a starting point for reliably being able to build chiens, as I painfully remember building my first few chiens with no consistent method, and getting all sorts of broken, wobbly, or unrepeatable shapes.
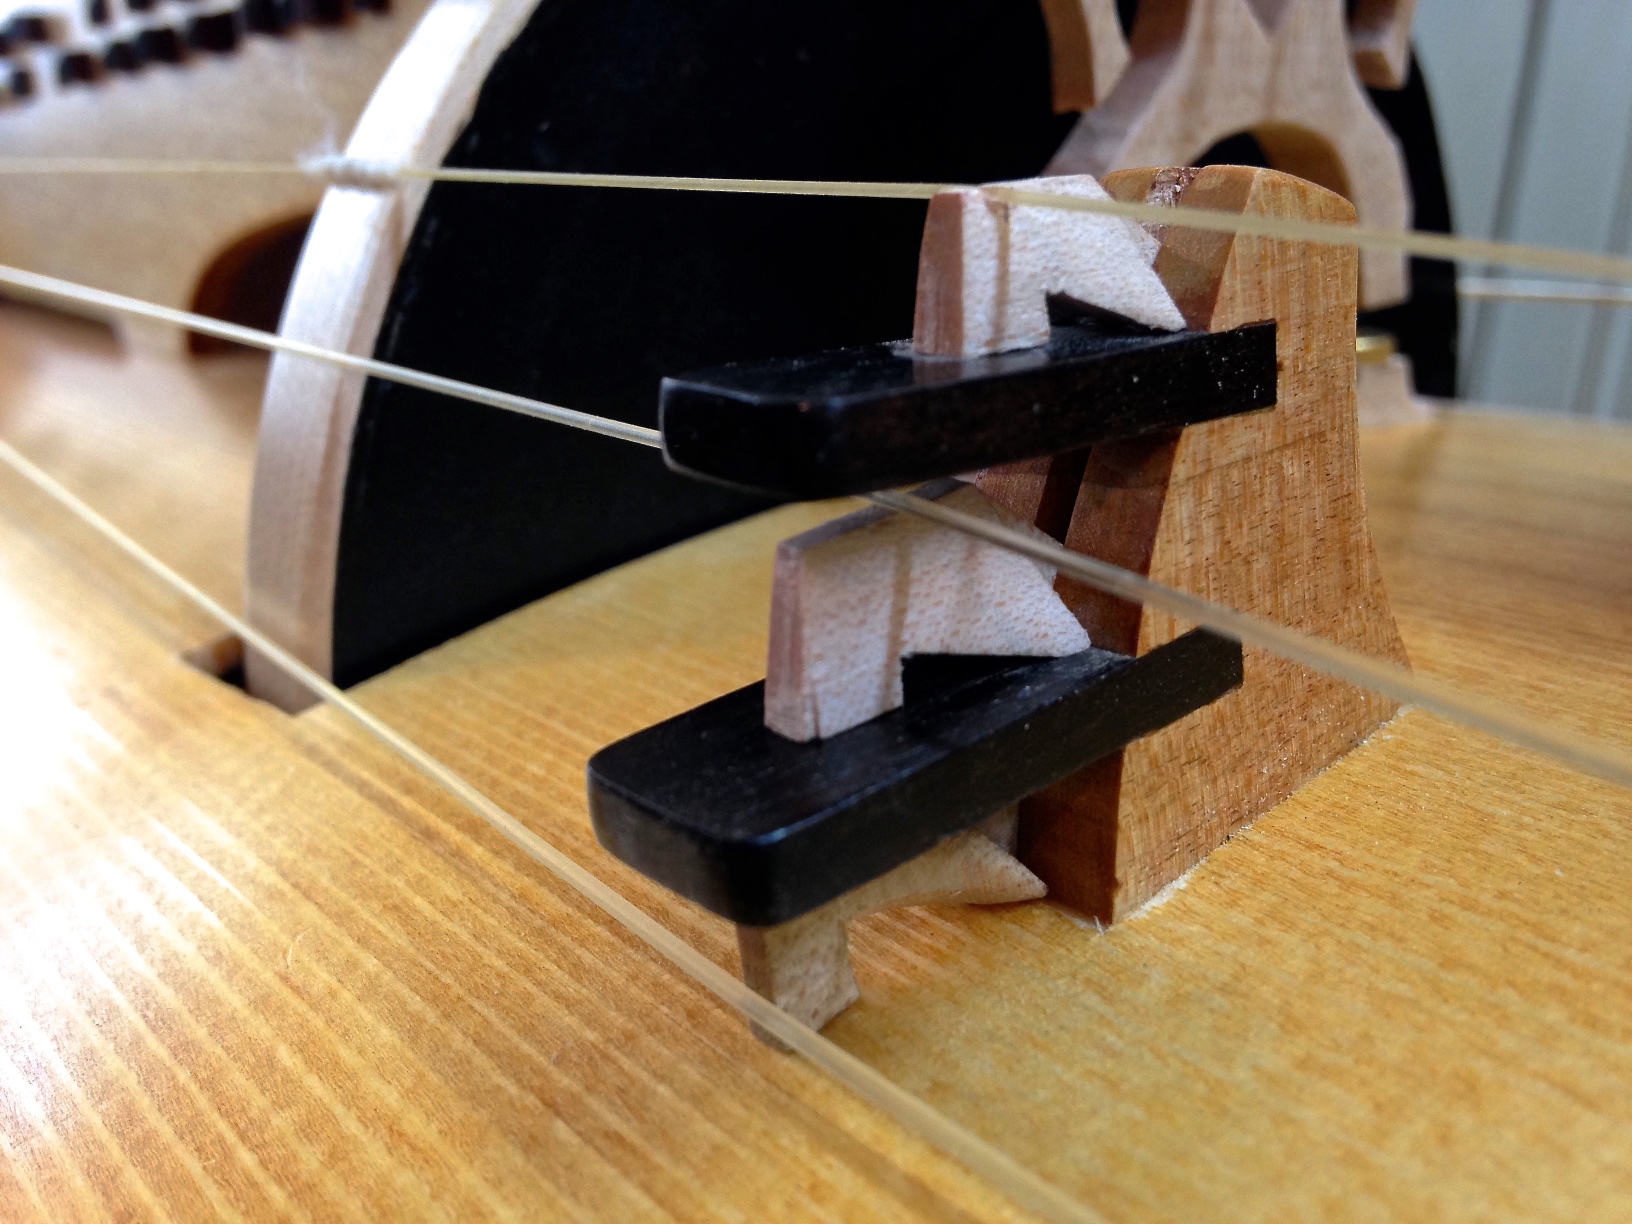
The chien in context
Before building a chien, familiarise yourself with the purpose and function of a chien, and specifically the chien(s) on your instrument. If you are replacing an existing chien, note the following factors of the chien:
- The material the chien is made of (usually maple). If wood, how is the grain oriented?
- The general proportions of the chien, and specifically:
- The height of the chien
- The distance between the heels and the string slot
- The length, shape and thickness of the tail
- The size and shape of the cut-out between the heels and foot
- The width of the heels
- The width of the foot
- The angle of the foot, and position of the string slot relative to the foot
- The width of the top of the chien
…and of the surroundings:
- The width and depth of the slot for the chien tail
- The surface the chien hammers against. Is it a spruce soundboard? A bone/pearl/hardwood plate in a softwood soundboard? An elevated ebony/bone/hardwood plate?
- The pressure and angle of the string against the wheel
- The string angles between the chien and the tail end of the instrument, where the string is attached
- How much the string angle must be changed by the tirant (buzzing bridge-adjusting string) in order to get a useful buzzing sensitivity
- The vertical angle of the tirant, and what happens to the chien when it is loose or very tight
- The trompette string. Gut or synthetic? What diameter? How taught at pitch? New, or old and worn?
Observe and experiment with how your chien fits in its support, and how it works:
- Observe how snugly the chien tail fits into the slot. How much play is there?
- Observe whether the heels of the chien both touch the support block
- With the tail fully inserted, do the two heels of the chien and the foot all touch the plate?
- While playing, use your left hand to play with the string angles and observe the results.
- Without a string on the chien, test how it tilts. Does the chien tilt smoothly on the edges of the feet against the angle between the plate and the support block?
- If your instrument has more than one chien, observe any differences between them.
- If your chien has an adjustable support, experiment with extremes of pressure. How light can the pressure be for the chien to be usable? How does the response change as the pressure is increased? When does it become unusable?
Study, measure and photograph your chien, and try to do the same for other chiens. Draw chiens from memory then compare them to the real ones. Having a clear idea of how chiens function and are shaped will allow you build them much more easily, and give you a more detailed understanding of the results of your experiments.
Play over the full response of your trompette and chien. Turn the wheel as slowly and evenly as you possibly can, and note the sound — it’s probably a light, toneless scratching. Increase the speed until you notice a change in sound, then remain at that speed until you can reliably hold that sound. Slowly repeat until you can’t turn the wheel any faster. Take the exercise seriously, and don’t rush it. You’ll probably notice a series of levels something like this:
- A series of scratching sounds, either soft or violent depending on the string pressure and angle against the wheel
- The beginnings of a periodic, musical tone, but still scratchy and usually a bit flatter than the normal string sound
- The plain string sound, first quiet and then louder
- Faint, hard-to-control ghost buzzes
- A solid buzzing sound which barely interferes with the string pitch and is easy to control and maintain
- A series of more intense/subtly changing buzzing sounds, leading to:
- The final stage; usually a distorted, crackly buzz with a noticeably detuned string pitch. If you end up with no buzz at all at high speeds, try adding more rosin.
Depending on your instrument and playing skills, you may have (or notice) more or fewer levels, and may notice severe string detuning earlier in the process. Use this process to familiarise yourself with the sound and response of your chien, and to try to articulate what you like or dislike about it. Record the sound if possible. Repeat for all chiens on your instrument, and optionally for all capo settings if you have trompette capos. If you really have a lot of time and motivation, add a melody string and repeat the process (perhaps a bit more quickly and condensed) for every note in the first octave. Notice changes in the sound and response (especially of very light buzzes) for each melody string note. Playing different melody string notes against a trompette is a subtle, under-appreciated technique for altering the chien sound.
The trompette+chien is a whole instrument by itself. On a hurdy gurdy, it is doomed and blessed to permanently interact and interdepend with the other elements making up this small mixed consort. Understand and use it accordingly.
Tools and materials
These are the tools I have to hand when making chiens. It’s possible, if less convenient, to make them with fewer tools.

Top: maple chien blank.
Middle row: engineers square, 320 grit sandpaper, 4mm chisel, 3/4" chisel, craft knife, flat needle file, 0.5mm mechanical pencil, vernier calipers
Bottom: back/gentlemans saw
Not pictured but also necessary: a sturdy vice and a bench hook for supporting material while being cut.
All the usual safety tips apply:
- Make sure all your tools are sharp! Chisel and knife blades should be free from dents and sharp enough to shave arm/knuckle hair. Using sharp tools provides better results and is safer, as lower cutting pressure is required.
- Make sure the workpiece is always firmly held in place by clamps or a vice.
- When possible, always cut away from your body.
- When cutting, concentrate on the whole length of the blade, not just where you want/expect the cutting to happen.
- Don’t use sharp tools if you’re inebriated, feeling uncoordinated, hungry, thirsty, grumpy or otherwise distracted.
Marking the blank
![]()
For the material, I typically use a bar of maple with approximately a 10mm × 10mm cross section. I match the grain direction with the melody string bridge, i.e. having the grain lines parallel with the side which will be the bottom of the chien. Here, the blank is 8.5mm × 10mm.
Make sure the blank is straight, the corners are right angles, and that the tail end is flat and square with the sides.

Mark the tail width onto the top and bottom of the blank with vernier calipers, filling the line in with pencil. Decide on the tail width, in this case 2mm. The width of the blank is 8.5mm, so mark (8.5mm - 2mm) ÷ 2 to get 3.25. Set the calipers to 3.25mm, and drag twice along the blank to create a dent 3.25mm in from each edge, marking a 2mm wide strip in the centre. Mark the top and tail end of the blank. You can mark the bottom either with the tail width, or the foot width (if different) using the same technique.

Mark the sides of the chien. Here, I am aiming for a 5mm tail length, 5mm shoulder between the heels and the straight part of the top, and an overall length of 21mm. Coupled with the 10mm height of the blank, these measurements should work for most instruments. Adapt as necessary.
Join the ticks up across the top and bottom of the chien:

Add a mark 3mm up on the tail end of the chien, to define the point of the tail.
Join the ticks up along the sides of the chien to show the shape.
Carve the tail

Most of the chien shaping is done whilst it is still attached to the rest of the blank by the foot, allowing us to firmly clamp it. We start with the tail.
First, place the marked blank in a vice so that the shoulder-heel line is parallel with the vice. Using a fine backsaw, cut outside the marked tail lines, up to just before the shoulder and heel lines marked on the top and bottom of the blank.
Pay attention whilst cutting. Keep all the angles as square as possible. Check on the underside to make sure the saw isn’t getting tilted.

Holding the blank firmly against a bench hook, saw carefully outside the shoulder-heel lines until the waste material falls off. Don’t saw through the tail! Lengthen the cuts from the previous step if necessary for the cuts to “join up”.

You should end up with a blank with a roughly cut but straight and even tail. Discard the waste material (shown here only for clarity).

At this point it may be necessary to change the height of the chien. Test the fit into the available space on your instrument. In this case, the blank is too tall for the space between the plates on this three chien instrument.

Place the chien vertically, then horizontally, in the vice and carefully make two cuts to remove some material.

Now that the height fits, check the fit of the tail in the slot. If it already fits smoothly after the rough saw cut then you marked or cut the tail too thin. In this case, only the very tip starts to fit before the tail encounters resistance.

Cut the tail to its final shape before fitting it. Placing the tail up against the bench hook, use a chisel to cut from the heel and shoulder lines towards the tip. Cut in multiple strokes, removing a maximum of 1mm each time, and removing less as you get closer to the final shape, for a clean cut.
The exact shape of the cut on the top side doesn’t matter too much, but the cut on the bottom is vital for correct chien function! Making sure this cut is perfectly in line with the heel line marked out on the bottom of the chien will save you a lot of work later.

After the cuts you should have a clean, pointy tail. Check the fit in the slot, and using the chisel, knife and flat needle file, slowly remove material from wherever the tail is sticking until the fit is snug but free of resistance.
Shaping the body

With a fitted tail, we can continue to shape the body of the chien. Place the chien on its side in the bench hook, and make two cuts a few millimetres in along the foot lines, to just outside the width of the foot. If your chien will have a very thin foot, leave a larger tab between the chien and the blank so that it doesn’t break off during the rest of the shaping.

We will now shape the body of the chien in two chisel cuts on each side — firstly, setting the shoulder angle and top width, then setting the foot width and chien profile.
Place the blank in the vice and use a chisel to make the first cut, taking off an even angle between the chien top width and the bottom edge, giving this result:


Now, rotate the chien 90° in the vice and use the chisel to take material off the sides. The blade should be parallel to the side of the blank all along the cut. Be careful to not take any material off the tips of the heels, and to avoid making the foot too thin. Try to make the cuts on each side as even as possible, so that the foot is centred and the overall shape of the chien is symmetrical:


Remove any shavings which hang on to the blank (the knife is good for this task). You should now have a chien with a smooth clean line bisecting the angle between the bottom and the shoulder angle.
Defining the base

Now we aim to get the chien to rest on a sturdy tripod made up of the foot and the two heels. First, hold the blank in the bench hook and saw where you want the inside of the foot to be. Only saw about 2mm down — it’s easy to make the cut-out larger later, but if you cut too thin or all the way through then you have to start out from the beginning.

Place the blank upside-down in the vice and use a chisel to remove the material between the heels and the foot cut from the last step. Remove only a very small amount of material with each cut, and apply very little pressure, to avoid cutting all the way through the foot. Leave around 1mm of heel.

Using the chisel or knife, scoop out some material between the two heels to ensure the chien rests on the heel edges and not a point in the middle.
Re-cut the bottom of the tail after making this adjustment, to make it straight again.
![]()
Use the knife and file to clean up any rough edges or surfaces. Lightly sand the chien with 320 grit sandpaper. At this point, the chien is ready to be separated from the blank for final fitting. Hold the blank in the bench hook and use the saw to carefully cut down the front of the foot. Here I gave the foot an angle.
Place 320 grit sandpaper on a clean, flat surface and rub the chien on it lightly to create a provisional flat base surface.
Final adjustment
Place the chien in its slot, and place the trompette string on the top surface, at or close to the final tension. Slide the string along the surface, until it’s barely touching the wheel. Turn the wheel; the string should make a faint but clear sound. Use the mechanical pencil to mark the string position on the chien.

Use the knife to cut a triangular slot into the chien for the string to fit into. Test the chien out and make the string slot slightly deeper if the string doesn’t make a clear sound.

Place the string in the slot at full tuned tension, and place the 320 grit sandpaper under the foot. Slide it back and forth to correct the fit of the foot against the plate.

Adjust the tirant and try playing the chien. If it works perfectly, congratulations! Otherwise, observe what the problems are, make further adjustments to the foot, heels, tail and string slot and note the results.