Easily one of the worst front-end web failure modes I’ve ever seen, apparently caused by Ghostery blocking access to gapi, which is completely unnecessary for reading the article
New #indieweb libraries: taproot/micropub-adapter and taproot/indieauth!
Finally put the finishing touches on these two closely-related libraries, which make it quick and easy to add Micropub and IndieAuth support to any PHP app which uses PSR-7.
Feedback appreciated, either as replies, GH issues, or at indieweb.org/discuss
PHPUnit’s HTML code coverage reports don’t play nicely with GitHub pages “main branch /docs folder” by default, as they store CSS, JS and icon assets in folders prefixed with underscores.
Here’s a little bash script to run tests with code coverage enabled, then move the assets around:
rm -rf docs/coverage/
XDEBUG_MODE=coverage  ./vendor/bin/phpunit tests --coverage-filter src --coverage-html docs/coverage
mv docs/coverage/_css docs/coverage/phpunit_css
mv docs/coverage/_icons docs/coverage/phpunit_icons
mv docs/coverage/_js docs/coverage/phpunit_js
grep -rl _css docs/coverage | xargs sed -i "" -e 's/_css/phpunit_css/g'
grep -rl _icons docs/coverage | xargs sed -i "" -e 's/_icons/phpunit_icons/g'
grep -rl _js docs/coverage | xargs sed -i "" -e 's/_js/phpunit_js/g'
That allows you to use GitHub pages to show code coverage reports as well as docs, as I’m doing for taproot/indieauth.
Here’s a python snippet for analysing an iNaturalist export file and exporting an HTML-formatted list of species which only have observations from a single person (e.g. this list for the CNC Wien 2021)
# coding: utf-8
import argparse
import pandas as pd
"""
Find which species in an iNaturalist export only have observations from a single observer.
Get an export from here: https://www.inaturalist.org/observations/export with a query such
as quality_grade=research&identifications=any&rank=species&projects[]=92926 and at least the
following columns: taxon_id, scientific_name, common_name, user_login
Download it, extract the CSV, then run this script with the file name as its argument. It will
output basic stats formatted as HTML.
The only external module required is pandas.
Example usage:
py uniquely_observed_species.py wien_cnc_2021.csv > wien_cnc_2021_results.html
If you provide the --project-id (-p) argument, the taxa links in the output list will link to
a list of observations of that taxa within that project. Otherwise, they default to linking
to the taxa page.
If a quality_grade column is included, non-research-grade observations will be included in the
analysis. Uniquely observed species with no research-grade observations will be marked. Species
which were observed by multiple people, only one of which has research-grade observation(s) will
also be marked.
By Barnaby Walters waterpigs.co.uk
"""
if __name__ == "__main__":
parser = argparse.ArgumentParser(description='Given an iNaturalist observation export, find species which were only observed by a single person.')
parser.add_argument('export_file')
parser.add_argument('-p', '--project-id', dest='project_id', default=None)
args = parser.parse_args()
uniquely_observed_species = {}
df = pd.read_csv(args.export_file)
# If quality_grade isn’t given, assume that the export contains only RG observations.
if 'quality_grade' not in df.columns:
df.loc[:, 'quality_grade'] = 'research'
# Filter out casual observations.
df = df.query('quality_grade != "casual"')
# Create a local species reference from the dataframe.
species = df.loc[:, ('taxon_id', 'scientific_name', 'common_name')].drop_duplicates()
species = species.set_index(species.loc[:, 'taxon_id'])
for tid in species.index:
observers = df.query('taxon_id == @tid').loc[:, 'user_login'].drop_duplicates()
research_grade_observers = df.query('taxon_id == @tid and quality_grade == "research"').loc[:, 'user_login'].drop_duplicates()
if observers.shape[0] == 1:
# Only one person made any observations of this species.
observer = observers.squeeze()
if observer not in uniquely_observed_species:
uniquely_observed_species[observer] = []
uniquely_observed_species[observer].append({
'id': tid,
'has_research_grade': (not research_grade_observers.empty),
'num_other_observers': 0
})
elif research_grade_observers.shape[0] == 1:
# Multiple people observed the species, but only one person has research-grade observation(s).
rg_observer = research_grade_observers.squeeze()
if rg_observer not in uniquely_observed_species:
uniquely_observed_species[rg_observer] = []
uniquely_observed_species[rg_observer].append({
'id': tid,
'has_research_grade': True,
'num_other_observers': observers.shape[0] - 1
})
# Sort observers by number of unique species.
sorted_observations = sorted(uniquely_observed_species.items(), key=lambda t: len(t[1]), reverse=True)
print(f"<p>{sum([len(t) for _, t in sorted_observations])} taxa uniquely observed by {len(sorted_observations)} observers.</p>")
print('<p>')
for observer, _ in sorted_observations:
print(f"@{observer} ", end='')
print('</p>')
print('<p><b>bold</b> species are ones for which the given observer has one or more research-grade observations.</p>')
print('<p>If only one person has RG observations of a species, but other people have observations which need ID, the number of needs-ID observers are indicated in parentheses.')
for observer, taxa in sorted_observations:
print(f"""\n\n<p><a href="https://www.inaturalist.org/people/{observer}">@{observer}</a> ({len(taxa)} taxa):</p><ul>""")
for tobv in sorted(taxa, key=lambda t: species.loc[t['id']]['scientific_name']):
tid = tobv['id']
t = species.loc[tid]
if args.project_id:
taxa_url = f"https://www.inaturalist.org/observations?taxon_id={tid}&project_id={args.project_id}"
else:
taxa_url = f'https://www.inaturalist.org/taxa/{tid}'
rgb, rge = ('<b>', '</b>') if tobv.get('has_research_grade') else ('', '')
others = f" ({tobv.get('num_other_observers', 0)})" if tobv.get('num_other_observers', 0) > 0 else ''
if not pd.isnull(t['common_name']):
print(f"""<li><a href="{taxa_url}">{rgb}<i>{t['scientific_name']}</i> ({t['common_name']}){rge}{others}</a></li>""")
else:
print(f"""<li><a href="{taxa_url}">{rgb}<i>{t['scientific_name']}</i>{rge}{others}</a></li>""")
print("</ul>")
I finally got Visual Studio Code’s terminal and tab handling working the way I wanted, with these keybindings:
[
  {
      "key": "shift+cmd+]",
      "command": "workbench.action.terminal.focusNext",
      "when": "terminalFocus"
  },
  {
      "key": "shift+cmd+[",
      "command": "workbench.action.terminal.focusPrevious",
      "when": "terminalFocus"
  },
  {
      "key": "cmd+w",
      "command": "workbench.action.terminal.kill",
      "when": "terminalFocus"
  },
  {
      "key": "ctrl+`",
      "command": "workbench.action.terminal.focus"
  },
  {
      "key": "ctrl+`",
      "command": "workbench.action.focusActiveEditorGroup",
      "when": "terminalFocus"
  }

]
This way, cmd+shift+] and cmd+shift+[ not only allow you to switch between editor tabs, but also terminals, when the terminal is focused. cmd+w kills the current terminal tab as expected. ctrl+` switches focus between the editor and the terminal.
I was considering overriding cmd+t to open a new terminal when the terminal is focused, but decided to just get used to the built in ctrl+shift+` shortcut instead.
A Camomile tip I learned the hard way: audio units built using camomile (and presumably VSTs and lv2s too) will stop working if you rename them, as they rely on the bundle filename, the .txt configuration file and the main .pd patch all sharing the same base name in order to function.
 Aaron Parecki
For python, the lack of type information for function signatures and return values in the documentation has always annoyed me.
The lack of naming consistency in the standard library, too — it’s almost as bad as PHP, with nospaces, under_scores and CamelCase at every level: modules, classes, functions, arguments.
I can’t think of a third major annoyance off the top of my head though, and almost every time I use another programming language, I end up realising just how well designed some aspect of python is, so it’s not doing too badly.
Experimenting with some computational musicology on a vast corpus of traditional music compiled by a friend. Extrapolating from the last few hours, I anticipate the first complete analysis will take 2.5 days to complete on my macbook. Plenty of time to research how to build a raspberry pi parallel computing cluster…
It just took me about 30 mins to figure it out, so here’s how to install python plugins in KiCad 5.0 on a Mac.
- Make sure your build of KiCad has scripting enabled. It looks like fresh downloads have it by default, but it doesn’t hurt to check. Go KiCad → About KiCad → Show Version Info and make sure that all of the
KICAD_SCRIPTING_flags are set to ON. - Find pcbnew’s plugin search path list. Open pcbnew, and open Tools → Scripting Console. Run
import pcbnew; print pcbnew.PLUGIN_DIRECTORIES_SEARCHand you’ll see a list of folders which pcbnew will search for plugins - Move your plugin files/folders to one of these locations
- In pcbnew, Tools → External Plugins… → Refresh Plugins. Your Tools → External Plugins menu should fill up with plugins.

magnetic fields
#TIL about tcpdump, a very handy little command line utility for looking at network traffic. Not as fully featured as Wireshark, but nice if you want to e.g. pipe network traffic into another process. It’s also not >300MB :/
When using the python2.7 gzip module with StringIO, it’s extremely important to call GzipFile.close() after you’ve finished writing to it. If you don’t, the archive will probably not be readable as the CRC record will not be appended, and you’ll get a bunch of IOErrors despite everything looking fine.
For anyone building theSlowGrowth’s Monome Arc clone project, here are the avrdude commands required to set the ATMega88p fuses, based on this fuse calculation:
avrdude -V -p m88p -c YOUR_PROGRAMMER_ID -P YOUR_PROGRAMMER_PORT -B 10 -e -u -U lfuse:w:0xD6:m -U hfuse:w:0xDF:m -U efuse:w:0xF9:m -U lock:w:0xFF:m
and then flashing the precompiled firmware is pretty straightfoward. USB board: (swap arc4_ for arc2_ in the unlikely event you’re building an arc2):
avrdude -V -p m88p -c YOUR_PROGRAMMER_ID -P YOUR_PROGRAMMER_PORT -B 2 -U flash:w:./firmware/compiled_hex/arc4_firmware_usb_board_atmega88p.hex:i -U lock:w:0xFF:m
and for each ring:
avrdude -V -p m88p -c YOUR_PROGRAMMER_ID -P YOUR_PROGRAMMER_PORT -B 2 -U flash:w:./firmware/compiled_hex/firmware_pot_board_atmega88p.hex:i -U lock:w:0xFF:m
Note that the verion of avrdude I’m using (5.8, from an old crosspack install I was using to compile some MI AVR code) doesn’t support the ATMega88p, and in order for any of this to work, you may need to edit the avrdude config file according to the instructions in the arc clone repo. Mine was in /usr/local/CrossPack-AVR-20100115/etc/avrdude.conf, and all I had to do was duplicate the config block for the ATMega88 and make the following changes:
id               = "m88p";
desc             = "ATMEGA88P";
and
signature = 0x1e 0x93 0x0f;
Turns out that it’s possible to use cheaply available (~2€ each) 7-pin SPI OLED displays with the magpie modular 8hp microbraids PCBs. A hardware and software modification are required, although as the ATMega is using software SPI it may be possible to work around the hardware modification with further software modifications.
Please note that I would not recommend building the magpie modular micro braids module! Instead, try one of the newer adaptions (e.g. the one from Antumbra) which uses normal LED displays and have prettier panels. This guide is intended as reference for people who still have one of the old boards lying around and want to get it working without shelling out 20€ or more for a tiny OLED module.
The seven pin SPI header on the cheap OLEDs I bought maps to the eight pin header of the original Adafruit OLED (and therefore the microbraids PCB) like this:
CS DC RS MOSI CLK Vin GND
|    X      X      |        \
CS RS DC CLK MOSI Vin 3.3v GND
I cut the relevant traces on the OLED board, scratched away some solder mask and used enamel-insulated wire to connect the traces to their new pins. Then, I installed a 7 pin female header on the braids PCB, and bridged the 3.3v and GND pins, which sounds like a terrible idea, but the board doesn’t make any use of the 3.3v pin, I’m just using it as a convenient way of connecting the OLED GND pin to the braids GND pin.
If your OLED module has the same layout as mine, it should end up looking something like this:


The display ends up being in a slightly different place to the original, but five minutes of filing the aluminium panel fixed that. It ended up looking a little bit messy, but the panel (from pusherman, not a magpie modular original) is extremely ugly anyway so it didn’t make much difference. I quickly cut out and filed a 3mm acrylic screen, wedged it in place and secured it with some high-viscoscity superglue.
After reflowing and flashing both the ATMega and STM, everything was working perfectly, except the display was upside-down. Looking through the Adafruit graphics library led to a simple solution: adding the following line to the init function on line 39 of mbraidsv3.ino:
display.setRotation(2); // Invert display for use with cheap Aliexpress 7-pin OLED
After re-flashing the ATMega, everything worked perfectly.
It was only after I made the hardware modification that I noticed the ATMega is using a software SPI library, with the pin definitions on lines 9-13 of mbraidsv3.ino. It should therefore be possible to achieve exactly the same result by leaving the OLED module unmodified, bridging the 3.3V and GND pins on the 8 pin OLED header on the PCB, and swapping the pin definitions around so they look like this:
#define OLED_MOSI   10
#define OLED_CLK   9
#define OLED_DC    13
#define OLED_CS    12
#define OLED_RESET 11
The display rotation mod will still be necessary, unless your display module is oriented differently. If anyone attempts the software modification please let me know, I’d be curious to know if it works!
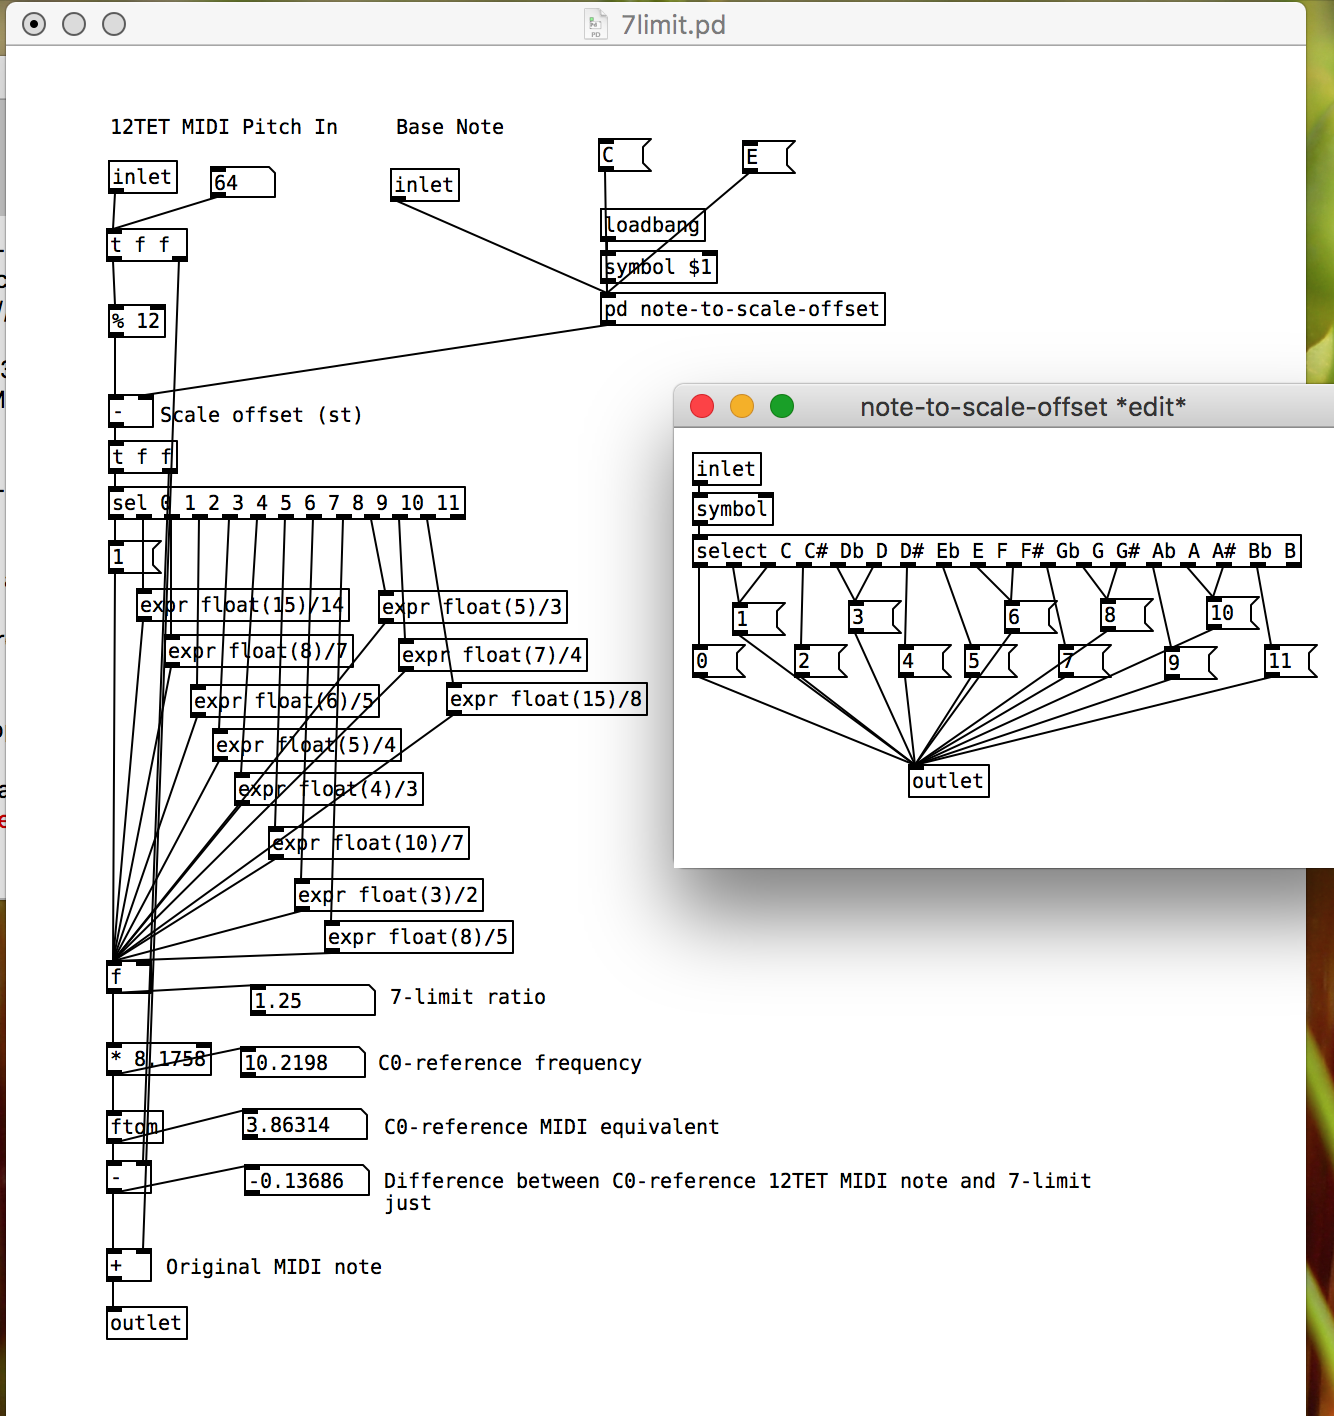
Today’s late-night puredata madness: creating a 7-limit just intonation abstraction which takes standard 12TET MIDI note numbers and spits the 7-limit just version, expressed as a decimal MIDI note number:
Talking of [filterview] (gh), here’s the abstraction I made for it, incorporating stereo smooth filters and a nice mode switching UI made of a [hslider] hidden behind a bunch of canvases.
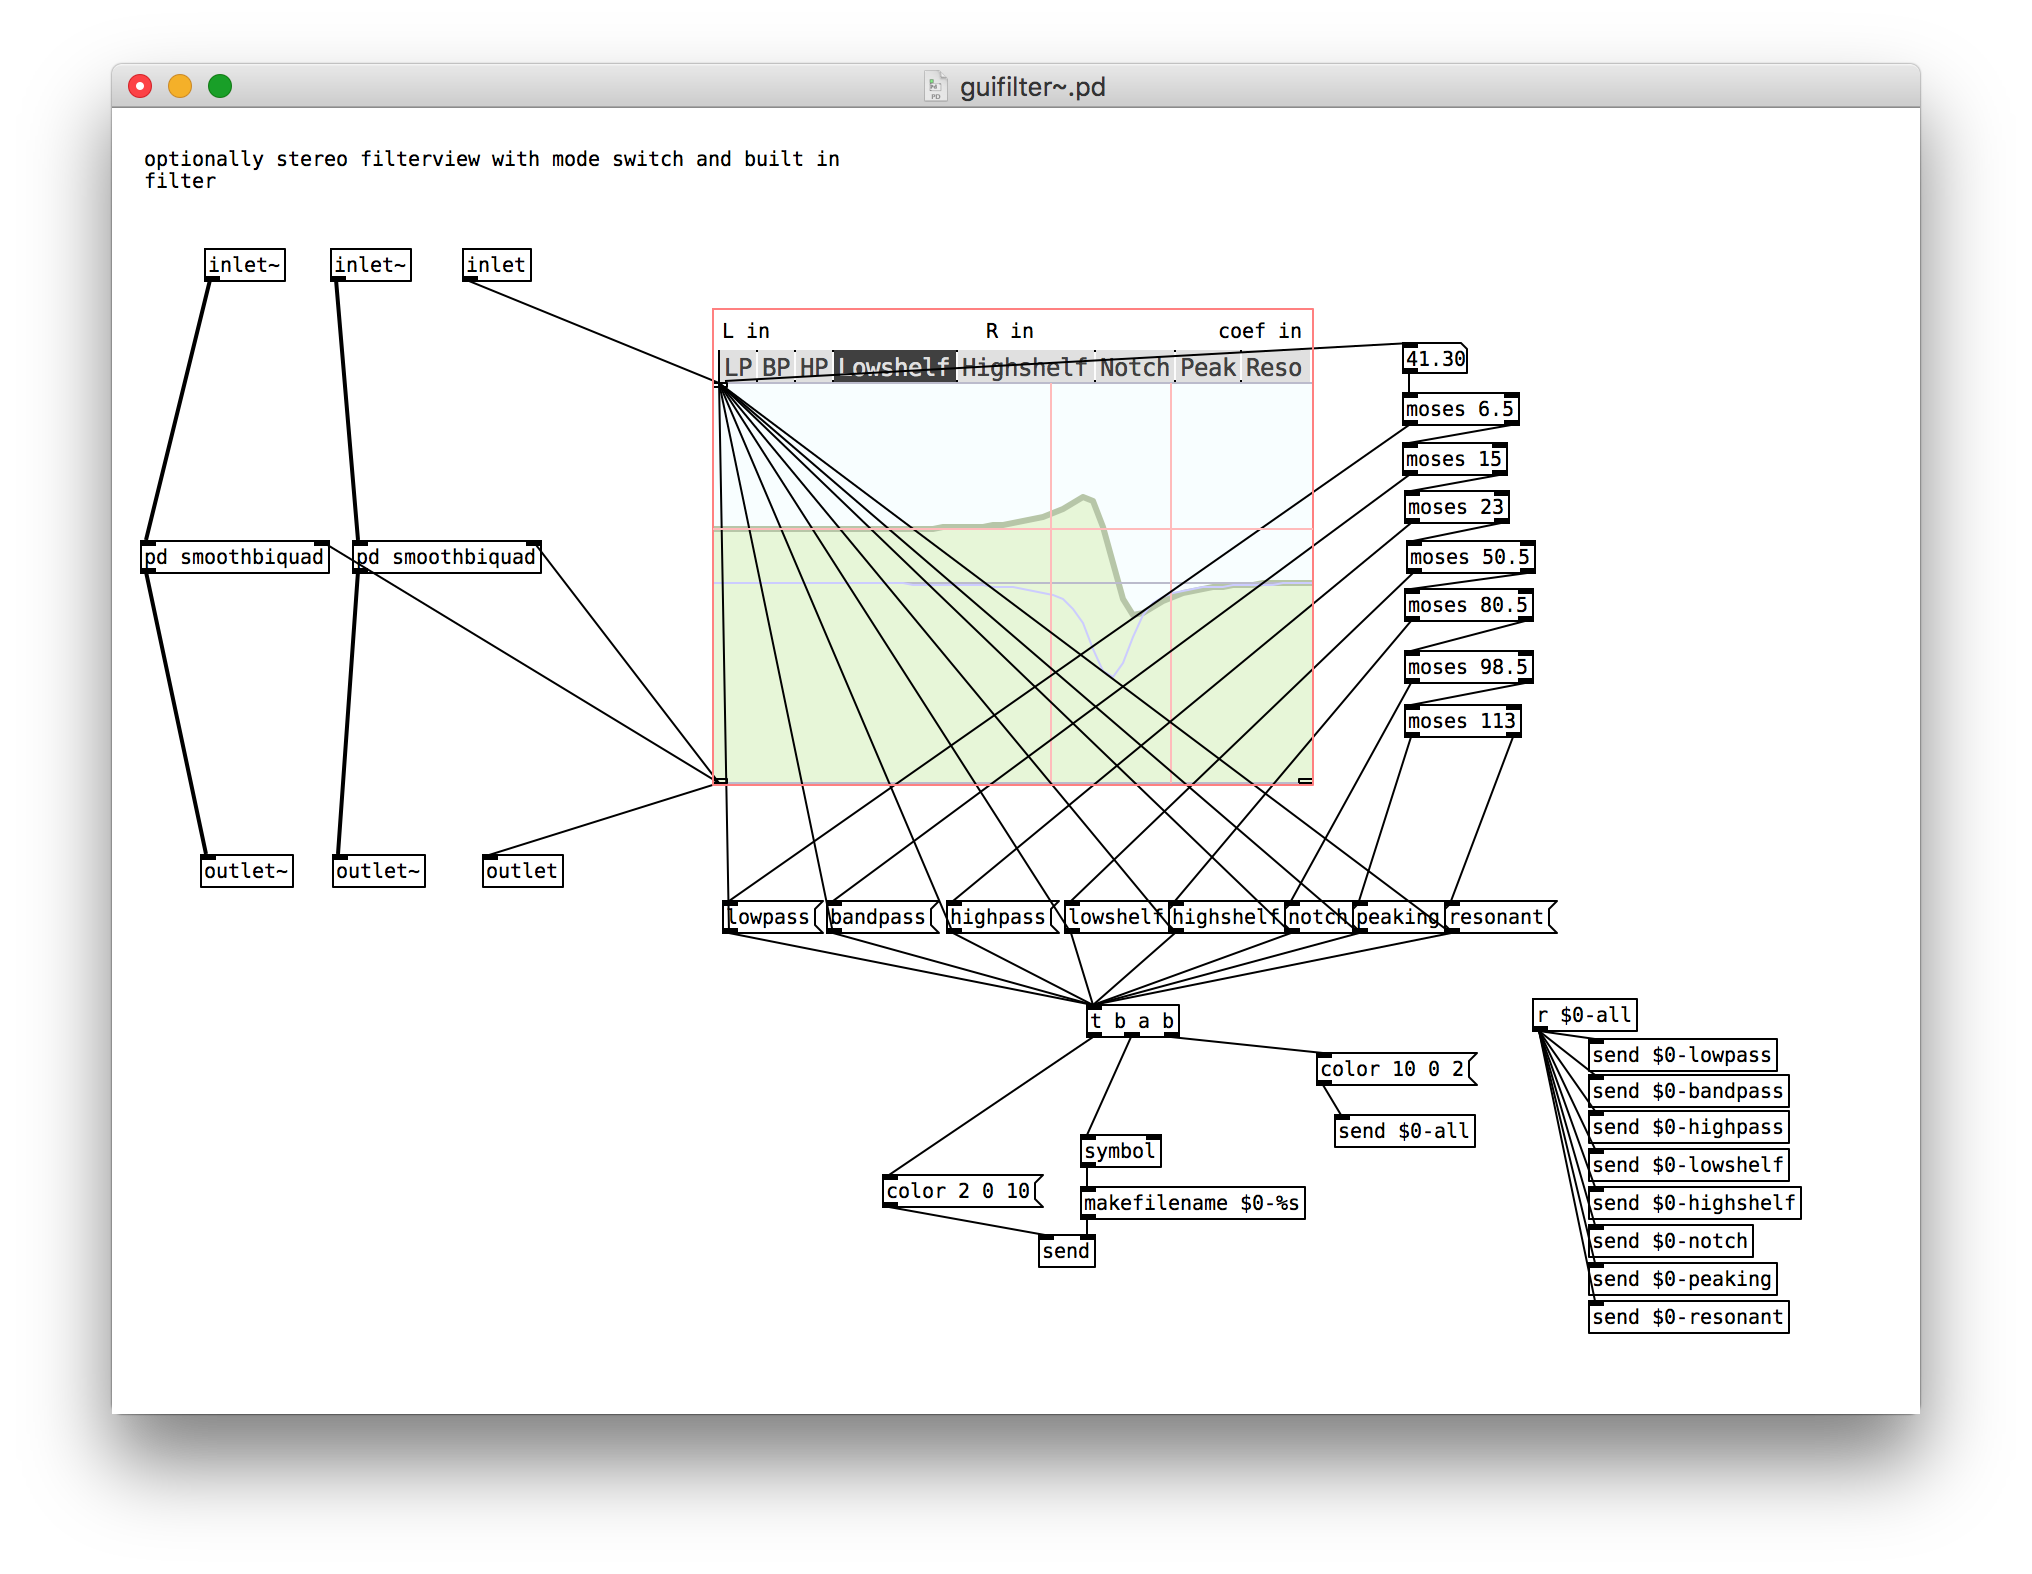
Each canvas has a receive ID of $0- plus the symbol for the relevant filter mode, making the message sending for changing the colours easy.
[biquad~] clicks and pops when changing coefficients, which is annoying when they’re coming from the [filterview] UI. The best way I found of smoothing them was to alternate between two biquad~ objects and crossfade between them over 3ms. This approach, while a little cludgy, is probably generalisable to a lot of similar Pd situations where smooth transitions are desirable.

Software upgrade for the MI Shruthi: Visual Sequencer
One particularly cool feature of the Shruthi is being able to set the mixer mode to seqmix and have the control values in the step sequencer determine which sound sources are active on each step. The problem with this is (or, was!) that, even with the clever binary-based approach for determining how combinations of sound sources map to hexadecimal (0-15) values, it’s incredibly hard to remember the mappings.
I spent an hour or so trawling through the synth code, and documentation for the LCD module, before managing to create a version of the software which, when the mixer operator is set to seqmix, replaces the 0-f step sequencer view with a two-line visual step sequencer, where the four lines from bottom to top represent osc2, osc1, sub and noise*
The controls for the view are exactly the same as before, i.e. pretty unintuitive, but this visualisation of the sequence data makes designing patterns way easier than before.
Here’s the software, as .hex and .syx for flashing or SYSEX dumping:
I originally wanted to have this view all on one line, by creating sixteen custom characters, one representing each combination of sound sources by a bar of pixels. Unfortunately, the HD44780 LCD module only supports eight custom characters, and the Shruthi already defines all of them. I got around this by spreading the display over two lines, reducing the number of characters needed to four, and taking advantage of the “=” default character as the “11” character, and the blank space as the “00” character. I then replaced the two decorative custom characters used on the Shruthi splash screen with single bar characters based on the “=” for “01” and “10”. Finally, in the Editor::DisplayStepSequencerPage function in editor.cc, I made a conditional block based on the state of part.patch().osc[0].option (the non-intuitive location of the mixer operator), displaying the two-line visual view if it’s set to OP_PING_PONG_SEQ.
This is the first of several UI upgrades I plan on making to the Shruthi firmware, depending on how much I can tolerate working on old embedded code in a language I barely know!
*according to the shruthi manual, osc1 and osc2 should be the other way round, but that’s how it ends up working so I accepted it as it is.